sRDI 0 to 1
sRDI 对 ReflectiveDLLInjection 技术进行了改进,实现了一种将 DLL 转换为 shellcode 的技术,我们可以通过分析 sRDI 的技术原理来学习如何在 Windows 中无文件执行 PE 文件。本篇文章会介绍 sRDI 的发展史和技术原理,以及如何使用 sRDI 来武器化我们的工具。
项目地址:https://github.com/monoxgas/sRDI
Blog:https://www.netspi.com/srdi-shellcode-reflective-dll-injection/
RDI 技术的历史
简单回顾一下恶意软件如何在 Windows 中执行自定义代码:
最原始的方法是上传一个 exe 文件到某个目录并执行,这种方法简单粗暴,缺点也很明显:会创建一个新进程,因此特征较为明显。当恶意软件不再希望创建一个新进程,想要转为在远程进程中执行代码,DLL 注入技术便开始被使用。传统的 DLL 注入技术依赖 LoadLibrary 函数加载 DLL 到内存中,并调用 CreateRemoteThread 执行代码。DLL 注入也存在一些问题:一方面 LoadLibrary 仅支持从文件读取 DLL,不支持内存加载,随着安全软件对恶意 PE 文件的静态检测能力逐渐增强,将恶意代码直接写入文件系统的风险越来越大。这时候便需要一种通过内存加载执行 PE 文件的技术,于是有人开始研究 PE 文件格式,手动实现了 PE 文件的解析、加载和执行。此时 PE 文件的执行不再依赖 LoadLibrary,不再需要写入文件系统,转为了更难检测的无文件执行技术。
DLL 的内存执行技术分为两部分:加载器和 DLL。具体实现上有两个分支:一种是 MemoryModule,在加载器中实现了 MemoryLoadLibrary 加载 DLL;另一种是 ReflectiveDLLInjection(以下简称 RDI),在 DLL 中实现 ReflectiveLoader 函数,在加载器中实现 GetReflectiveLoaderOffset 函数计算 ReflectiveLoader 的偏移,然后执行 ReflectiveLoader 函数加载 DLL 并调用 DLLMain。著名的 Metasploit 就大量使用了 RDI 技术,它太过著名以至于将 RWX 内存分配变成了恶意行为的一重要指标。RDI 原作者已不再更新,现在由 Rapid7 和 Metasploit 社区维护:https://github.com/rapid7/ReflectiveDLLInjection。之后 Dan Staples 推出了 ImprovedReflectiveDLLInjection,通过添加引导程序增加了 RDI 调用导出函数、参数传递和跨架构注入等功能。
最后是本文中的 sRDI,相对于 RDI 技术,在灵活性和易用性上更进一步,改进了 RDI 的一些缺陷:位置无关的 shellcode 可以以多种方式用少量代码加载执行,shellcode 可以调用 DllMain 之外的导出函数,并向导出函数传递参数;RDI 每次修改都需要同 RDI 项目一同编译,加载器也需要包含特定代码,需要熟悉 RDI 技术才能使用;sRDI 只需要编写常规 DLL,不需要了解技术细节,生成 shellcode 只需要一个脚本;sRDI 分配了适当的内存权限,不再出现大量 RWX 内存,同时可以选择在内存中清除 PE 头,内存特征更少。
sRDI 的项目结构
xxxxxxxxxx└─sRDI-master│ .gitignore│ LICENSE│ README.md│ ShellcodeRDI.sln│├─bin│ .gitignore│├─DotNet│ │ App.config│ │ DotNet.csproj│ │ Program.cs│ ││ └─Properties│ AssemblyInfo.cs│├─FunctionTest│ FunctionTest.cpp│ FunctionTest.vcxproj│ FunctionTest.vcxproj.filters│ stdafx.cpp│ stdafx.h│ targetver.h│├─lib│ ├─PowerShell│ │ Get-FunctionHash.ps1│ │ Get-LibSymbols.ps1│ │ Get-ObjDump.format.ps1xml│ │ Get-PEHeader.ps1│ │ Out-Shellcode.ps1│ ││ └─Python│ EncodeBlobs.py│ FunctionToHash.py│├─Native│ Loader.cpp│ Native.vcxproj│ Native.vcxproj.filters│ stdafx.cpp│ stdafx.h│ targetver.h│├─PowerShell│ ConvertTo-Shellcode.ps1│ Invoke-Shellcode.ps1│├─Python│ ConvertToShellcode.py│ Python.pyproj│ ShellcodeRDI.py│├─ShellcodeRDI│ function_link_order.txt│ GetProcAddressWithHash.h│ ShellcodeRDI.c│ ShellcodeRDI.vcxproj│ ShellcodeRDI.vcxproj.filters│└─TestDLLdllmain.cppresource.hResource.rcTestDLL.vcxprojTestDLL.vcxproj.filters
sRDI 项目分为以下几个部分:
ShellcodeRDI:重写的 ReflectiveLoader 函数 LoadDLL
GetProcAddressWithHash.h:通过 PEB 和 hash 对比获取导出函数地址
ShellcodeRDI.c:实现 LoadDLL 函数
function_link_order.txt:用于链接器确定链接顺序的文件
FunctionTest:用于测试 LoadDLL 函数的项目
Native,DotNet,Python,PowerShell:sRDI 的核心部分
ConvertToShellcode 和 GetProcAddressR 的 C++、C#、Python、PowerShell 实现
Invoke-Shellcode.ps1:来自 PowerSploit 的 shellcode 执行脚本
TestDLL:用于测试的 DLL
DllMain 调用 MessageBox
两个导出函数:SayGoodbye,SayHello
lib\Python
EncodeBlobs.py:ShellcodeRDI.bin 嵌入 Loader.cpp/Program.cs/ConvertTo-Shellcode.ps1/ShellcodeRDI.py 的脚本
FunctionToHash.py:模块名 + 函数名 转换为 hash
lib\PowerShell
Get-FunctionHash.ps1:模块名 + 函数名 转换为 hash
Get-PEHeader.ps1:解析 PE 头
Out-Shellcode.ps1:提取 PE 文件中的
.text段并去除末尾的空字节
sRDI 的使用方法
快速上手
如果想要快速上手 sRDI,最简单的方式是使用 ConvertToShellcode.py。
准备一个 MyDLL_x86.dll,然后 python ConvertToShellcode.py MyDLL_x86.dll 即可得到 shellcode,一个 .bin 文件,添加其他参数可控制 shellcode 的行为。
命令行参数
xxxxxxxxxxusage: ConvertToShellcode.py [-h] [-v] [-f FUNCTION_NAME] [-u USER_DATA] [-c] [-i] [-d IMPORT_DELAY] input_dllRDI Shellcode Converterpositional arguments:input_dll DLL to convert to shellcodeoptional arguments:-h, --help show this help message and exit-v, --version show program's version number and exit-f FUNCTION_NAME, --function-name FUNCTION_NAMEThe function to call after DllMain-u USER_DATA, --user-data USER_DATA Data to pass to the target function-c, --clear-header Clear the PE header on load-i, --obfuscate-imports Randomize import dependency load order-d IMPORT_DELAY, --import-delay IMPORT_DELAY Number of seconds to pause between loading imports
input_dll,-h,-v:这三个参数的作用显而易见,分别是需要被转换的 DLL、显示 help 信息、显示版本。
-c,-i,-d:用于控制 shellcode 的加载逻辑。
项目作者对可选功能的说明:(ConvertToShellcode.py 中不包含对 CLEARMEMORY 的支持)
The PE loader code uses
flagsargument to control the various options of loading logic:
SRDI_CLEARHEADER[0x1]: The DOS Header and DOS Stub for the target DLL are completley wiped with null bytes on load (Except for e_lfanew). This might cause issues with stock windows APIs when supplying the base address as a psuedoHMODULE.
SRDI_CLEARMEMORY[0x2]: After calling functions in the loaded module (DllMainand any exports), the DLL data will be cleared from memory. This is dangerous if you expect to continue executing code out of the module (Threads /GetProcAddressR).
SRDI_OBFUSCATEIMPORTS[0x4]: The order of imports in the module will be randomized before starting IAT patching. Additionally, the high 16 bits of the flag can be used to store the number of seconds to pause before processing the next import. For example,flags | (3 << 16)will pause 3 seconds between every import.
-c:控制 DLL 加载后是否清除 PE 头-i:在处理 DLL 的 IAT 时,是否使用随机导入顺序-d:在处理 DLL 的 IAT 时,每个导入函数之间的暂停时间
-f,-u:sRDI 支持在调用 DllMain 后额外调用一个 DLL 的 “导出函数”
-f:导出函数名称-u:传递给导出函数的参数
这里的 “导出函数” 加了引号是因为它不同于一般的导出函数,沿用源码中的名字我称它为 exportFunc。
exportFunc 与常规导出函数有两处不同:
函数原型:
exportFunc的函数原型必须为BOOL EXPORTFUNC(LPVOID lpUserdata, DWORD nUserdataLen),因此使用这个功能需要能够访问 DLL 的源代码,一个没有源代码的 DLL 是没办法使用这个功能的。函数调用的时间与方式:
exportFunc在 sRDIshellcode 执行时被调用,调用代码包含在 shellcode 中,而导出函数的调用需要在 sRDIshellcode 执行后,使用 shellcode 之外的代码进行调用。
示例:
python ConvertToShellcode.py -f myfuction -u data -c -d 5 MyDLL_x86.dll
这会生成一个调用 DllMain 后调用 myfuction,参数为 data,加载时清除 PE 头,随机导入调用函数,每个导入延迟为 5 秒的 shellcode。
sRDI 的技术原理
ConvertToShellcode
首先看这个项目的核心函数 ConvertToShellcode,它通过将以下 4 部分合并为一个 blob,实现 DLL to Shellcode 的功能:
Bootstrap:引导程序,获取内存当前位置,传递参数给 RDI。
RDI:ConvertToShellcode 中的 rdiShellcode 32/64,由 ShellcodeRDI 编译后提取 .TEXT 段得到。
DLL:原始 DLL。
User-Data:需要向 DLL 导出函数传递的参数。
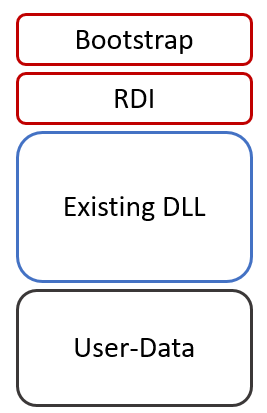
Bootstrap
引导程序的功能:获取当前内存位置,向 RDI 传递参数。
32 位
位置独立:
call-pop:call next instruction 会将 eip/rip 值入栈,再 pop 将值取出就可以得到当前内存位置。
xxxxxxxxxx// call next instruction (Pushes next instruction address to stack)bootstrap[i++] = 0xe8;bootstrap[i++] = 0x00;bootstrap[i++] = 0x00;bootstrap[i++] = 0x00;bootstrap[i++] = 0x00;// pop eax - Capture our current location in memorybootstrap[i++] = 0x58;计算参数:
xxxxxxxxxx// Set the offset to our DLL from pop resultdllOffset = sizeof(bootstrap) - i + rdiShellcodeLength;// mov edx, eax - copy our location in memory to ebx before we start modifying eaxbootstrap[i++] = 0x89;bootstrap[i++] = 0xc2;// add eax, <Offset to the DLL>bootstrap[i++] = 0x05;MoveMemory(bootstrap + i, &dllOffset, sizeof(dllOffset));i += sizeof(dllOffset);// add edx, <Offset to the DLL> + <Size of DLL>bootstrap[i++] = 0x81;bootstrap[i++] = 0xc2;userDataLocation = dllOffset + length;MoveMemory(bootstrap + i, &userDataLocation, sizeof(userDataLocation));i += sizeof(userDataLocation);参数入栈:
xxxxxxxxxx// push <Flags>bootstrap[i++] = 0x68;MoveMemory(bootstrap + i, &flags, sizeof(flags));i += sizeof(flags);// push <Length of User Data>bootstrap[i++] = 0x68;MoveMemory(bootstrap + i, &userLength, sizeof(userLength));i += sizeof(userLength);// push edxbootstrap[i++] = 0x52;// push <hash of function>bootstrap[i++] = 0x68;MoveMemory(bootstrap + i, &userFunction, sizeof(userFunction));i += sizeof(userFunction);// push eaxbootstrap[i++] = 0x50;栈指针和帧指针:
xxxxxxxxxx// push ebpbootstrap[i++] = 0x55;// move ebp, espbootstrap[i++] = 0x89;bootstrap[i++] = 0xe5;// leavebootstrap[i++] = 0xc9;leave 等同于:
xxxxxxxxxxmov esp, ebppop ebpebp 寄存器通常被用作帧指针,程序通过 ebp + 偏移量 的方式定位参数,但这不是必须的。
比如 MSVC 中 /Oy[-] 控制是否省略帧指针,没有帧指针的程序更难调试,但不影响执行。
调用 RDI,清理堆栈:
xxxxxxxxxx// call - Transfer execution to the RDIbootstrap[i++] = 0xe8;bootstrap[i++] = sizeof(bootstrap) - i - 4; // Skip the remainder of instructionsbootstrap[i++] = 0x00;bootstrap[i++] = 0x00;bootstrap[i++] = 0x00;// add esp, 0x14 - clean up stack from args (cdecl)bootstrap[i++] = 0x83;bootstrap[i++] = 0xc4;bootstrap[i++] = 0x14;// leavebootstrap[i++] = 0xc9;// ret - return to callerbootstrap[i++] = 0xc3;32 位 Bootstrap 采用 cdecl,对应 ShellcodeRDI 中调用约定的配置,ShellcodeRDI 中的调用约定为默认配置。
/Gd, the default setting, specifies the __cdecl calling convention for all functions except C++ member functions and functions that are marked __stdcall, __fastcall, or __vectorcall.
64 位
前两条指令同 32 位:
xxxxxxxxxx// call next instruction (Pushes next instruction address to stack)bootstrap[i++] = 0xe8;bootstrap[i++] = 0x00;bootstrap[i++] = 0x00;bootstrap[i++] = 0x00;bootstrap[i++] = 0x00;// pop rcx - Capture our current location in memorybootstrap[i++] = 0x59;设置寄存器参数:x64 调用约定
xxxxxxxxxx// Set the offset to our DLL from pop resultdllOffset = sizeof(bootstrap) - i + rdiShellcodeLength;// mov r8, rcx - copy our location in memory to r8 before we start modifying RCXbootstrap[i++] = 0x49;bootstrap[i++] = 0x89;bootstrap[i++] = 0xc8;// add rcx, <Offset of the DLL>bootstrap[i++] = 0x48;bootstrap[i++] = 0x81;bootstrap[i++] = 0xc1;MoveMemory(bootstrap + i, &dllOffset, sizeof(dllOffset));i += sizeof(dllOffset);// mov edx, <hash of function>bootstrap[i++] = 0xba;MoveMemory(bootstrap + i, &userFunction, sizeof(userFunction));i += sizeof(userFunction);// Setup the location of our user data// add r8, <Offset of the DLL> + <Length of DLL>bootstrap[i++] = 0x49;bootstrap[i++] = 0x81;bootstrap[i++] = 0xc0;userDataLocation = dllOffset + length;MoveMemory(bootstrap + i, &userDataLocation, sizeof(userDataLocation));i += sizeof(userDataLocation);// mov r9d, <Length of User Data>bootstrap[i++] = 0x41;bootstrap[i++] = 0xb9;MoveMemory(bootstrap + i, &userLength, sizeof(userLength));i += sizeof(userLength);保存寄存器和堆栈对齐:
xxxxxxxxxx// push rsi - save original valuebootstrap[i++] = 0x56;// mov rsi, rsp - store our current stack pointer for laterbootstrap[i++] = 0x48;bootstrap[i++] = 0x89;bootstrap[i++] = 0xe6;// and rsp, 0x0FFFFFFFFFFFFFFF0 - Align the stack to 16 bytesbootstrap[i++] = 0x48;bootstrap[i++] = 0x83;bootstrap[i++] = 0xe4;bootstrap[i++] = 0xf0;寄存器的易失性与非易失性:rsi 和 rsp 是非易失性寄存器,更改之前需要先保存,并在过程结束时恢复。
shadow space:
xxxxxxxxxx// sub rsp, 0x30 - Create some breathing room on the stack bootstrap[i++] = 0x48;bootstrap[i++] = 0x83;bootstrap[i++] = 0xec;bootstrap[i++] = 6 * 8; // 32 bytes for shadow space + 8 bytes for last arg + 8 bytes for stack alignmentThe parameter area is always at the bottom of the stack (even if
allocais used), so that it will always be adjacent to the return address during any function call. It contains at least four entries, but always enough space to hold all the parameters needed by any function that may be called. Note that space is always allocated for the register parameters, even if the parameters themselves are never homed to the stack; a callee is guaranteed that space has been allocated for all its parameters. Home addresses are required for the register arguments so a contiguous area is available in case the called function needs to take the address of the argument list (va_list) or an individual argument. This area also provides a convenient place to save register arguments during thunk execution and as a debugging option (for example, it makes the arguments easy to find during debugging if they are stored at their home addresses in the prolog code). Even if the called function has fewer than 4 parameters, these 4 stack locations are effectively owned by the called function, and may be used by the called function for other purposes besides saving parameter register values. Thus the caller may not save information in this region of stack across a function call.
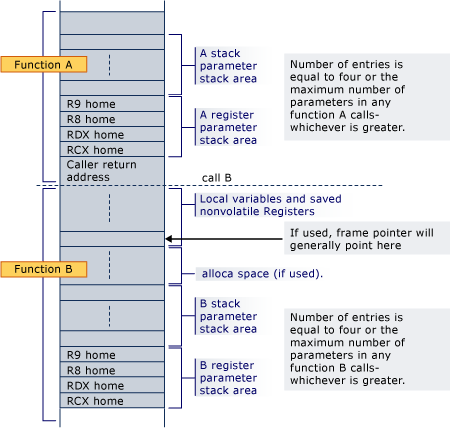
设置堆栈参数:
xxxxxxxxxx// mov dword ptr [rsp + 0x20], <Flags> - Push arg 5 just above shadow spacebootstrap[i++] = 0xC7;bootstrap[i++] = 0x44;bootstrap[i++] = 0x24;bootstrap[i++] = 4 * 8;MoveMemory(bootstrap + i, &flags, sizeof(flags));i += sizeof(flags);调用 RDI,清理堆栈,恢复寄存器:
xxxxxxxxxx// call - Transfer execution to the RDIbootstrap[i++] = 0xe8;bootstrap[i++] = sizeof(bootstrap) - i - 4; // Skip over the remainder of instructionsbootstrap[i++] = 0x00;bootstrap[i++] = 0x00;bootstrap[i++] = 0x00;// mov rsp, rsi - Reset our original stack pointerbootstrap[i++] = 0x48;bootstrap[i++] = 0x89;bootstrap[i++] = 0xf4;// pop rsi - Put things back where we left thembootstrap[i++] = 0x5e;// ret - return to callerbootstrap[i++] = 0xc3;GetProcAddressR
GetProcAddressR 实现了类似 GetProcAddress 的功能,传入模块句柄和函数名,返回函数指针。
解析导出表:nt 头 --> 数据目录 --> 导出目录 --> 遍历导出目录
xxxxxxxxxxFARPROC GetProcAddressR(HMODULE hModule, LPCSTR lpProcName){  if (hModule == NULL || lpProcName == NULL)    return NULL;
  PIMAGE_NT_HEADERS ntHeaders = RVA(PIMAGE_NT_HEADERS, hModule, ((PIMAGE_DOS_HEADER)hModule)->e_lfanew);  PIMAGE_DATA_DIRECTORY dataDir = &ntHeaders->OptionalHeader.DataDirectory[IMAGE_DIRECTORY_ENTRY_EXPORT];  if (!dataDir->Size)    return NULL;
  PIMAGE_EXPORT_DIRECTORY exportDir = RVA(PIMAGE_EXPORT_DIRECTORY, hModule, dataDir->VirtualAddress);  if (!exportDir->NumberOfNames || !exportDir->NumberOfFunctions)    return NULL;
  PDWORD expName = RVA(PDWORD, hModule, exportDir->AddressOfNames);  PWORD expOrdinal = RVA(PWORD, hModule, exportDir->AddressOfNameOrdinals);  LPCSTR expNameStr;
  for (DWORD i = 0; i < exportDir->NumberOfNames; i++, expName++, expOrdinal++) {    expNameStr = RVA(LPCSTR, hModule, *expName);    if (!expNameStr)      break;    if (!_stricmp(lpProcName, expNameStr)) {      DWORD funcRva = *RVA(PDWORD, hModule, exportDir->AddressOfFunctions + (*expOrdinal * 4));      return RVA(FARPROC, hModule, funcRva);    }  }  return NULL;}
ShellcodeRDI
在阅读这部分代码之前,需要先了解两个话题:
Windows 中的 Shellcode vs PE
将代码编译为 PE 文件调用 Windows API 的基本流程是:
按照 stdcall 或者 x64 调用约定处理完参数后接一条 call 指令,call 指令后的地址指向导入表,通过加载器修改过的导入表中的地址跳转到对应的函数(这里 32/64 位的处理不尽相同,这里就不写出相关细节了)。在执行 PE 文件时由系统的 PE 加载器解析导入表,加载对应的 DLL 文件到内存中,解析 DLL 文件导出表,定位对应的导出函数。与 PE 文件不同,shellcode 是一段汇编指令,执行 shellcode 不会有 PE 加载器的参与,以上这些操作需要由 shellcode 自身实现,所以 Windows 中的 shellcode 一般通过 PEB 获取 DLL 基地址 + 解析导出表获取导出函数地址。
由于 ShellcodeRDI 这个项目最终通过编译为 PE 文件后提取 .TEXT 段的方式将 C 代码转换为 shellcode,因此这里的代码是 “shellcode 式” 的 C 代码,不依赖 .TEXT 段以外的数据:
位置无关,由于 shellcode 没有重定位表来修复绝对地址,所以要避免出现使用绝对地址的 C 代码。
不能直接调用 GetProcAddress,手动解析 Windows 函数地址。
没有链接到无关的外部库,由 shellcode 解决所有依赖关系。
将字符串声明为字节数组:运行时存储到栈,否则 MSVC 默认将字符串默认存储到 .rdata 段。
显式设置链接顺序。
API Hash
API Hash 是一种隐藏 Windows API 调用的技术,API Hash 实现类似于 GetProcAddress 的功能,但不使用字符串而是 hash。
传统的 API 调用方式会把信息存储在导入表中,使用 LoadLibrary + GetProcAddress 可以避免,但是这种方法会硬编码函数名字符串,依然容易检索。如果希望完全不使用函数名来调用 API,就需要使用 API Hash。
API Hash 的思路:选一种 hash 算法,确保常用 DLL 的导出函数计算 hash 后不冲突。当需要调用 API 时,遍历导出表,将每个导出函数名通过 hash 算法计算出 hash,与预先计算好需要调用的 API 函数名的 hash 对比,hash 相同就是指定的 API。
GetProcAddressWithHash
GetProcAddressWithHash 是一个通过 PEB 获取进程中 DLL 信息 + 对比哈希实现对 API 动态调用的函数。
获取 PEB 的地址:
xxxxxxxxxx PebAddress = (PPEB) __readgsqword( 0x60 ); PebAddress = (PPEB) __readfsdword( 0x30 );通过 PEB 获取所有已加载模块的信息:DLL 基地址、DLL 名、DLL 导出目录 RVA。
xxxxxxxxxxpLdr = (PMY_PEB_LDR_DATA) PebAddress->Ldr;pNextModule = pLdr->InLoadOrderModuleList.Flink;pDataTableEntry = (PMY_LDR_DATA_TABLE_ENTRY) pNextModule;pModuleBase = pDataTableEntry->DllBase;BaseDllName = pDataTableEntry->BaseDllName;pNTHeader = (PIMAGE_NT_HEADERS) ((ULONG_PTR) pModuleBase + ((PIMAGE_DOS_HEADER) pModuleBase)->e_lfanew);dwExportDirRVA = pNTHeader->OptionalHeader.DataDirectory[0].VirtualAddress;遍历每个模块的导出目录,获取导出函数名地址。
xxxxxxxxxxpExportDir = (PIMAGE_EXPORT_DIRECTORY) ((ULONG_PTR) pModuleBase + dwExportDirRVA);dwNumFunctions = pExportDir->NumberOfNames;pdwFunctionNameBase = (PDWORD) ((PCHAR) pModuleBase + pExportDir->AddressOfNames);将得到的 DLL 名和函数名进行 ROR13 运算得到 dwFunctionHash。
xxxxxxxxxx
for (i = 0; i < BaseDllName.MaximumLength; i++){ pTempChar = ((PCSTR) BaseDllName.Buffer + i); dwModuleHash = ROTR32( dwModuleHash, 13 ); if ( *pTempChar >= 0x61 ) { dwModuleHash += *pTempChar - 0x20; } else { dwModuleHash += *pTempChar; }}do{ dwFunctionHash = ROTR32( dwFunctionHash, 13 ); dwFunctionHash += *pTempChar; pTempChar++;} while (*(pTempChar - 1) != 0);
dwFunctionHash += dwModuleHash;将 dwFunctionHash 与传入的参数 dwModuleFunctionHash 进行比较,如果相同,则返回对应导出函数的地址。
xxxxxxxxxxif (dwFunctionHash == dwModuleFunctionHash){ usOrdinalTableIndex = *(PUSHORT)(((ULONG_PTR) pModuleBase + pExportDir->AddressOfNameOrdinals) + (2 * i)); return (HMODULE) ((ULONG_PTR) pModuleBase + *(PDWORD)(((ULONG_PTR) pModuleBase + pExportDir->AddressOfFunctions) + (4 * usOrdinalTableIndex)));}LoadDLL
ShellcodeRDI.c 中的 LoadDLL 实现了 DLL 的解析和加载,函数原型如下:
xxxxxxxxxxULONG_PTR LoadDLL(PBYTE dllData, DWORD dwFunctionHash, LPVOID lpUserData, DWORD nUserdataLen, DWORD flags)在 LoadDLL 的开始,首先调用了两次 GetProcAddressWithHash,获取了指向 LdrLoadDll 和 LdrGetProcedureAddress 的函数指针。
xxxxxxxxxxpLdrLoadDll = (LDRLOADDLL)GetProcAddressWithHash(LDRLOADDLL_HASH);pLdrGetProcAddress = (LDRGETPROCADDRESS)GetProcAddressWithHash(LDRGETPROCADDRESS_HASH);为什么是 LdrLoadDll 和 LdrGetProcedureAddress:这两个函数是 ntdll.dll 的导出函数,ntdll.dll 是进程初始化时第一个加载的 DLL,在任何进程中都可以保证 ntdll.dll 已加载,Kernel32.dll 则不然,在功能上分别对应 LoadLibrary 和 GetProcAddress。
通过以上两个函数,获取 Kernel32.dll 的模块句柄,获取相关 API 的函数指针。
xxxxxxxxxxpLdrLoadDll(NULL, 0, &uString, &library);FILL_STRING_WITH_BUF(aString, sVirtualAlloc);pLdrGetProcAddress(library, &aString, 0, (PVOID*)&pVirtualAlloc);分配内存
确认文件完整性,内存页对齐,分配读写权限内存。
xxxxxxxxxxbaseAddress = (ULONG_PTR)pVirtualAlloc(  (LPVOID)(ntHeaders->OptionalHeader.ImageBase),  alignedImageSize,  MEM_RESERVE | MEM_COMMIT, PAGE_READWRITE);
if (baseAddress == 0) {  baseAddress = (ULONG_PTR)pVirtualAlloc(    NULL,    alignedImageSize,    MEM_RESERVE | MEM_COMMIT, PAGE_READWRITE  );}
处理 Header
根据 flags 判断如何处理 header,这里对应可选功能 SRDI_CLEARHEADER,ConvertToShellcode.py 的 -c 参数。
xxxxxxxxxxif (flags & SRDI_CLEARHEADER) { ((PIMAGE_DOS_HEADER)baseAddress)->e_lfanew = ((PIMAGE_DOS_HEADER)dllData)->e_lfanew; for (i = ((PIMAGE_DOS_HEADER)dllData)->e_lfanew; i < ntHeaders->OptionalHeader.SizeOfHeaders; i++) { ((PBYTE)baseAddress)[i] = ((PBYTE)dllData)[i]; }}else{ for (i = 0; i < ntHeaders->OptionalHeader.SizeOfHeaders; i++) { ((PBYTE)baseAddress)[i] = ((PBYTE)dllData)[i]; }}加载文件的其他部分
加载段,处理重定位,处理导入表、延迟导入表。
处理导入表
这里对应可选功能 SRDI_OBFUSCATEIMPORTS,ConvertToShellcode.py 的 -i 参数。
xxxxxxxxxxdataDir = &ntHeaders->OptionalHeader.DataDirectory[IMAGE_DIRECTORY_ENTRY_IMPORT];randSeed = (DWORD)((ULONGLONG)dllData);
if (dataDir->Size) {
  importDesc = RVA(PIMAGE_IMPORT_DESCRIPTOR, baseAddress, dataDir->VirtualAddress);  importCount = 0;  for (; importDesc->Name; importDesc++) {    importCount++;  }
  importDesc = RVA(PIMAGE_IMPORT_DESCRIPTOR, baseAddress, dataDir->VirtualAddress);  if (flags & SRDI_OBFUSCATEIMPORTS && importCount > 1) {    sleep = (flags & 0xFFFF0000);    sleep = sleep >> 16;
    for (i = 0; i < importCount - 1; i++) {      randSeed = (214013 * randSeed + 2531011);      rand = (randSeed >> 16) & 0x7FFF;      selection = i + rand / (32767 / (importCount - i) + 1);
      tempDesc = importDesc[selection];      importDesc[selection] = importDesc[i];      importDesc[i] = tempDesc;    }  }
  importDesc = RVA(PIMAGE_IMPORT_DESCRIPTOR, baseAddress, dataDir->VirtualAddress);  for (; importDesc->Name; importDesc++) {
    library = pLoadLibraryA((LPSTR)(baseAddress + importDesc->Name));
    firstThunk = RVA(PIMAGE_THUNK_DATA, baseAddress, importDesc->FirstThunk);    origFirstThunk = RVA(PIMAGE_THUNK_DATA, baseAddress, importDesc->OriginalFirstThunk);
    for (; origFirstThunk->u1.Function; firstThunk++, origFirstThunk++) {
      if (IMAGE_SNAP_BY_ORDINAL(origFirstThunk->u1.Ordinal)) {        pLdrGetProcAddress(library, NULL, (WORD)origFirstThunk->u1.Ordinal, (PVOID*)&(firstThunk->u1.Function));      }      else {        importByName = RVA(PIMAGE_IMPORT_BY_NAME, baseAddress, origFirstThunk->u1.AddressOfData);        FILL_STRING(aString, importByName->Name);        pLdrGetProcAddress(library, &aString, 0, (PVOID*)&(firstThunk->u1.Function));      }    }
    if (flags & SRDI_OBFUSCATEIMPORTS && importCount > 1) {      pSleep(sleep * 1000);    }  }}
内存保护属性
设置内存保护属性,这里和 RDI 不同。
xxxxxxxxxxfor (i = 0; i < ntHeaders->FileHeader.NumberOfSections; i++, sectionHeader++) { if (sectionHeader->SizeOfRawData) { // determine protection flags based on characteristics executable = (sectionHeader->Characteristics & IMAGE_SCN_MEM_EXECUTE) != 0; readable = (sectionHeader->Characteristics & IMAGE_SCN_MEM_READ) != 0; writeable = (sectionHeader->Characteristics & IMAGE_SCN_MEM_WRITE) != 0; if (!executable && !readable && !writeable) protect = PAGE_NOACCESS; else if (!executable && !readable && writeable) protect = PAGE_WRITECOPY; else if (!executable && readable && !writeable) protect = PAGE_READONLY; else if (!executable && readable && writeable) protect = PAGE_READWRITE; else if (executable && !readable && !writeable) protect = PAGE_EXECUTE; else if (executable && !readable && writeable) protect = PAGE_EXECUTE_WRITECOPY; else if (executable && readable && !writeable) protect = PAGE_EXECUTE_READ; else if (executable && readable && writeable) protect = PAGE_EXECUTE_READWRITE; if (sectionHeader->Characteristics & IMAGE_SCN_MEM_NOT_CACHED) { protect |= PAGE_NOCACHE; } // change memory access flags pVirtualProtect( (LPVOID)(baseAddress + sectionHeader->VirtualAddress), sectionHeader->SizeOfRawData, protect, &protect ); }}原始 RDI 直接分配了一大块 RWX 内存,这也成为了检测 RDI 的一个标志。如果去看系统上常见的进程中的内存保护属性,是很少有 RWX 的,因此检测 RWX 内存也不会出现大量数据。所以在编写工具的时候应该尽量避免 RWX 的出现。
xxxxxxxxxx// allocate all the memory for the DLL to be loaded into. we can load at any address because we will// relocate the image. Also zeros all memory and marks it as READ, WRITE and EXECUTE to avoid any problems.uiBaseAddress = (ULONG_PTR)pVirtualAlloc( NULL, ((PIMAGE_NT_HEADERS)uiHeaderValue)->OptionalHeader.SizeOfImage, MEM_RESERVE|MEM_COMMIT, PAGE_EXECUTE_READWRITE );dllMain,exportFunc
调用入口点和一个指定导出函数:
xxxxxxxxxxdllMain = RVA(DLLMAIN, baseAddress, ntHeaders->OptionalHeader.AddressOfEntryPoint);dllMain((HINSTANCE)baseAddress, DLL_PROCESS_ATTACH, (LPVOID)1);
exportFunc = RVA(EXPORTFUNC, baseAddress, *(PDWORD)(baseAddress + exportDir->AddressOfFunctions + (*expOrdinal * 4)));exportFunc(lpUserData, nUserdataLen);
在这里我们可以看到,exportFunc 是有限制的,其函数原型必须为:
xxxxxxxxxxextern "C" __declspec(dllexport) RETURNTYPE myfuction(LPVOID lpUserdata, DWORD nUserdataLen)不能使用多个参数控制函数行为,如果需要多个参数,可以通过函数内拆解 userdata 来实现。
Loader.cpp 中的这部分可以体现它的用法:
xxxxxxxxxxConvertToShellcode(data, dataSize, HashFunctionName("SayHello"), "dave", 5, SRDI_CLEARHEADER, finalShellcode, finalSize);// Only set the first page to RWX// This is should sufficiently cover the sRDI shellcode up topif (VirtualProtect(finalShellcode, sysInfo.dwPageSize, PAGE_EXECUTE_READWRITE, &dwOldProtect1)) { RDI rdi = (RDI)(finalShellcode); printf("[+] Executing RDI\n"); HMODULE hLoadedDLL = (HMODULE)rdi(); // Excute DLL free(finalShellcode); // Free the RDI blob. We no longer need it. Function exportedFunction = (Function)GetProcAddressR(hLoadedDLL, "Uninstall"); if (exportedFunction) { printf("[+] Calling exported functon\n"); exportedFunction(); }}SayHello 就是 (HMODULE)rdi() 执行时在 DllMain 后执行的 exportFunc。Uninstall 则是一个不必遵循函数原型限制的导出函数,因为它是在 shellcode 执行后通过 GetProcAddressR 获取地址后调用的。
Why exportFunc
既然有 GetProcAddressR 了,还没有限制,为什么还需要 DllMain 后调用一个函数这个功能?
这里我的理解是,作者希望遵循 Dynamic-Link Library Best Practices。当我们不需要 GetProcAddressR 时,只想执行一次 shellcode 就收工,在这种场景下,可以遵循最佳实践,在 DllMain 中做尽量少的事情,将主要工作交给 SayHello 这样的函数,还有一个好处就是 DllMain 有些行为是完全不能做的,导出函数不会有这样的限制。
这里涉及到 ConvertToShellcode.py 的 -f 和 -u 参数,如果使用了这两个参数,需要在 DLL 中编写一个符合函数原型的导出函数,-f 后接函数名,-u 后接参数。
flags 参数传递
在 LoadDLL 中,通过参数 flags 决定是否使用可选功能。
可以在 FunctionTest 中找到 flag 传递参数的方式:
xxxxxxxxxxLoadDLL( (ULONG_PTR)buffer, HashFunctionName("SayGoodbye"), NULL, 0, SRDI_CLEARHEADER | SRDI_CLEARMEMORY | SRDI_OBFUSCATEIMPORTS | (3 << 16));这里和 VirtualAlloc 的参数传递方式是一样的,如何实现涉及到一些位运算的东西。
阅读涉及到 flags 的代码后,我提取了 flags 控制函数行为的逻辑,实现了一个有同样参数传递机制的函数 test,同时显示了 flag 的各个位的变化。
对一个 32 位的 DWORD 数进行位操作,高 16 位存储 flag3 所需的数据,低 16 位中的 3 位用于表示相应的 flag 参数是否传入,这也解释了为什么 flags 是 124。
xxxxxxxxxxusing namespace std;
DWORD flag1 = 0x1;DWORD flag2 = 0x2;DWORD flag3 = 0x4;void test(DWORD flags);
int main(){ DWORD flags = flag2; bitset<32> b1(flags); cout << "flagsbinary: " << b1 << endl; test(flags);
flags = flag1 | flag3 | (10 << 16); bitset<32> b2(flags); cout << "flagsbinary: " << b2 << endl; test(flags);
cin.get(); return 0;}
void test(DWORD flags) { cout << "flags&flag1: " << bitset<4>(flags & flag1) << endl; if (flags & flag1) { cout << "flag1 √" << endl; } else { cout << "flag1 ×" << endl; }
cout << "flags&flag2: " << bitset<4>(flags & flag2) << endl; if (flags & flag2) { cout << "flag2 √" << endl; } else { cout << "flag2 ×" << endl; }
cout << "flags&flag3: " << bitset<4>(flags & flag3) << endl; if (flags & flag3) { cout << "flag3 √" << endl; DWORD flag4 = (flags & 0xFFFF0000); bitset<32> bitsets(flag4); cout << "flag4binary: " << bitsets << endl; flag4 = flag4 >> 16; cout << "flag4: " << flag4 << endl; } else { cout << "flag3 ×" << endl; }}运行:
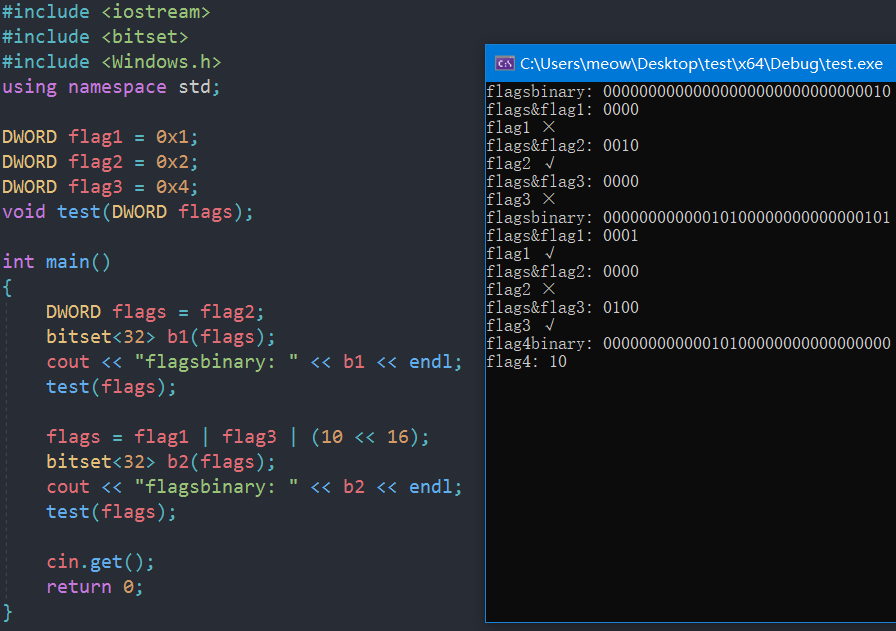
sRDI 的修改与扩展
sRDI 虽然代码量并不是很大,但是由于包含多种编程语言和多个组件,扩展和修改并不是一目了然的事。
开发和构建流程
首先需要做的事就是整合项目中的各个组件的功能,还原作者的开发和构建流程:
构思转换工具的基本思路
确定引导程序的功能和四段内存布局
需要 HashFunctionName ConvertToShellcode 两个核心函数
开发 Loader.cpp、Program.cs、ShellcodeRDI.py + ConvertToShellcode.py,通过 Add-Type 将 Program.cs 转换为 ConvertTo-Shellcode.ps1,留空 RDIShellcode 32/64
为了得到 RDIShellcode 开发 ShellcodeRDI 项目
开发过程中需要 API Hash,于是开发了 FunctionToHash.py Get-FunctionHash.ps1
配置编译链接参数
编写 unction_link_order.txt 用于链接器确定链接顺序
配置链接器 /MAP 选项,生成 ShellcodeRDI.map 文件
完成后需要提取 .TEXT 段,通过配置生成后事件调用 Out-Shellcode.ps1 Get-PEHeader.ps1,解析 PE 头并读取 ShellcodeRDI.map 获取 .TEXT 段实际长度,输出 bin 文件
得到 bin 文件后需要嵌入源代码的 RDIShellcode 32/64 位置,开发了 EncodeBlobs.py
至此大体上开发完成,剩下收尾工作。
理清开发和构建流程之后,我们做想要的修改就容易了。因为作者的开发流程是很工程化的,很多手动的的东西都做成了自动化脚本。
添加SRDI_CLEARMEMORY
前面提到过 ConvertToShellcode.py 中不包含对 CLEARMEMORY 的支持。
查看 SRDI_CLEARMEMORY 这部分代码:
xxxxxxxxxxif (flags & SRDI_CLEARMEMORY && pVirtualFree && pLocalFree) { if (!pVirtualFree((LPVOID)dllData, 0, 0x8000)) pLocalFree((LPVOID)dllData);}向前追溯,发现这两个函数指针初始化为 NULL 后就没有再赋值了,所以 flags 包含了 SRDI_CLEARMEMORY 也不会触发这段代码的执行。
xxxxxxxxxxVIRTUALFREE pVirtualFree = NULL;LOCALFREE pLocalFree = NULL;添加功能:同其他 API 一样,使用 FILL_STRING_WITH_BUF + pLdrGetProcAddress 获取函数指针。
xxxxxxxxxx// ShellcodeRDI.c 中的初始化部分typedef BOOL(WINAPI * VIRTUALFREE)(LPVOID, SIZE_T, DWORD);typedef BOOL(WINAPI * LOCALFREE)(LPVOID);
VIRTUALFREE pVirtualFree = NULL;LOCALFREE pLocalFree = NULL;
// 需要添加的部分BYTE sVirtualFree[] = {'V','i','r','t','u','a','l','F','r','e','e'};BYTE sLocalFree[] = {'L','o','c','a','l','F','r','e','e'};
FILL_STRING_WITH_BUF(aString, sVirtualFree);pLdrGetProcAddress(library, &aString, 0, (PVOID*)&pVirtualFree);
FILL_STRING_WITH_BUF(aString, sLocalFree);pLdrGetProcAddress(library, &aString, 0, (PVOID*)&pLocalFree);
可选:
xxxxxxxxxxif (!pVirtualAlloc || !pVirtualProtect || !pSleep || !pFlushInstructionCache || !pGetNativeSystemInfo || !pVirtualFree || !pLocalFree) { return 0;}修改后重新构建,得到 ShellcodeRDI_x64.bin 和 ShellcodeRDI_x86.bin。
使用 EncodeBlobs.py 将 bin 文件嵌入源代码:
xxxxxxxxxxpython EncodeBlobs.py C:\Users\...\sRDI
这里有一点小问题:ConvertTo-Shellcode.ps1 没有替换成功,查看文件编码为带有 BOM 的 UTF,修改为 UTF-8 解决。
xxxxxxxxxxTraceback (most recent call last):File "EncodeBlobs.py", line 112, in <module>main()File "EncodeBlobs.py", line 100, in maincode = open(posh_file,'r').read()UnicodeDecodeError: 'gbk' codec can't decode byte 0xbf in position 2: illegal multibyte sequence
修改 ConvertToShellcode.py 添加 -m 参数:
xxxxxxxxxxparser.add_argument('-m', '--clear-memory', dest='clear_memory', action='store_true', help='Clear the DLL data from memory')
if arguments.clear_header:  flags |= 0x1
if arguments.clear_memory:  flags |= 0x2
if arguments.obfuscate_imports:  flags = flags | 0x4 | arguments.import_delay << 16
现在在使用 ConvertToShellcode.py 是添加 -m 参数就会在 shellcode 运行后清除 dllData 了。